Cabinet Painting Sacramento is a more detailed process than house painting and requires the use of specialized paint. Taking shortcuts can lead to visible brushstrokes and peeling which will cost you more money in the long run.
All surfaces should be thoroughly cleaned and degreased. This will improve paint adhesion.
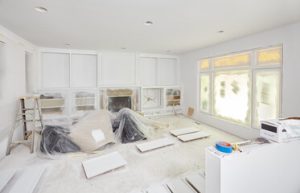
Painting cabinets is a popular DIY project for those looking to update their home with a fresh coat of paint. But if you want your cabinet painting to look professional and last, the right preparation process is essential. This step ensures that the paint adheres correctly, minimizes imperfections and produces a high-quality finish.
Before you begin, clear out your cabinets and move any items on the countertops or in the drawers to a safe spot. Then, use a degreaser to clean the surfaces of the cabinets and doors. This will remove any grease build-up and make it easier for the primer and paint to adhere. Then, lightly sand the cabinet surface with fine-grit sandpaper to create an even, smooth base for your new paint job. Make sure to wear a dust mask during this step to avoid inhaling the dust.
Once the cabinet surface is smooth, prime the cabinets with a suitable product for your cabinet material. Then, let the primer dry according to the manufacturer’s instructions. After the primer is fully dry, sand again with fine-grit sandpaper. This will create an even, smooth surface for the final coat of paint and help the surface resist stains and moisture.
If you’re using oil-based paint, allow it to fully dry before sanding or the cabinets will show through the new coat. But if you’re using a water-based paint, it may be possible to sand it and then apply a second coat without allowing the first coat to dry.
Finally, wipe the surfaces of your cabinets with a damp rag or tack cloth to make sure they’re clean and free of dust. This will make your finished product look better and protect it from damage.
If you don’t have the time or energy to prep your cabinets properly, or if you’re nervous about your ability to produce professional results, hire a professional to do the work for you. They’ll be able to work faster and more accurately than you could, while also ensuring that your cabinets look great. Just be sure to ask for referrals from friends and family and check out recent examples of their work before hiring someone.
Primer
Cabinets can take a beating in the kitchen, with frequent opening and closing and moisture from food preparation. When a new coat of paint is applied to cabinets without first using Cabinets primer, the result can be patchy and uneven. This is because the new paint doesn’t have a solid base to adhere to. A good primer can prevent this problem, helping the new coat of paint to look smooth and even with fewer strokes.
While there are different kinds of primers available, the best one for a cabinet painting project will depend on what type of material your cabinets are made from. For example, oil-based primers like Zinsser BIN Shellac Primer are ideal for stained or porous surfaces such as oak. They provide strong stain blocking and can help to hide nicotine stains that may have appeared in the past. However, these types of primers tend to produce more fumes than other options, making them less desirable for indoor areas.
A water-based option such as KILZ 2 All-Purpose Latex Primer is a great choice for cabinets with a glossy finish or laminate. It’s low-odor and works well with both drywall and wood. It also dries quickly, meaning you can get to work on your next steps sooner.
If your cabinets have a dark color underneath them, you will need to use a stain-blocking primer like the KILZ 3 Premium Stain Blocking Primer. It is an excellent option for hiding previous colors as well as water stains and mildew. Additionally, it provides excellent adhesion to slick surfaces like laminate or glossy paint and is mildew-resistant, making it ideal for high humidity areas such as bathrooms.
Once the surface has been cleaned with a degreaser, it should be lightly sanded to scuff up the sheen and provide a rougher surface for the primer and paint to adhere to. This step is important because paint does not bond well to greasy surfaces, and this can cause your finished job to chip and peel in the future.
Paint
Cabinets are exposed to the elements, so they need a durable finish. The best choice is a semi-gloss or glossy paint. This allows the cabinets to wipe clean and resist scuffs and scratches. It’s important to sand the surface before applying paint to ensure a smooth, even finish. Using medium grit sandpaper is a good start, but an electric sander is much faster and more efficient for large surfaces like cabinets.
Choose a good quality synthetic bristle brush to apply your cabinet paint. The brush will need to be trimmed to fit the width of the cabinet door, but this can easily be done with a hand tool. You can also use a foam roller for the flat areas, but it’s important to make sure you’re using a high quality brush on the trim and corners. This will give the finished cabinet a professional look that you’ll be proud of.
If you’re painting over existing painted cabinetry, be sure to test whether the old paint is oil-based or water-based. Rubbing alcohol (or acetone) and a cotton ball will help you determine the type of paint. Dip a cotton ball or small piece of cloth into the rubbing alcohol, then rub it over a spot on the surface that you’re unsure about. If the paint comes off, it’s water-based; if the surface doesn’t react, it’s likely an oil-based paint.
After sanding, vacuum up any sanding dust and wipe down the surface with a damp cloth or lint-free tack cloth. Then, degrease the surface with Krud Kutter or a degreaser like TSP. This will help the new paint adhere correctly and prevent grease from absorbing into the fresh coat of paint.
When it comes to choosing the right paint for your cabinet project, there are plenty of options available. You’ll want to consider the sheen of your cabinet paint – gloss, satin, or semi-gloss – as well as how many coats of paint you’ll need. You’ll also need to decide if you’ll be spraying your cabinets or using a brush and foam roller.
After a thorough cleaning, sanding and vacuuming of the surface, prime and then paint your cabinets. It’s crucial to allow the primer and paint to dry completely before reattaching the doors and hardware. This can take several days, so be patient!
Finish
Before the final coats of paint go on, it’s important to lightly sand the surface of the cabinet to create a smooth base for painting. This helps minimize the appearance of any imperfections in your finish and ensures that each coat of paint adheres properly to the previous coat. It’s also a good idea to use a high-quality primer. Primer provides a clean, even surface and seals the surface to help prevent any future stains from bleeding through your paint.
Once the sanding is complete, you’re ready to start the actual painting process. It’s important to work in small sections and apply several thin coats of paint. This will allow each coat to fully dry and cure before applying another. It’s also important to use a good quality brush and avoid applying too much pressure.
If you’re working with laminate cabinets, you may want to consider using a laminate-specific primer or paint. These products are specially formulated to bond with the slick surface of laminate and can make the painting process significantly easier. Once the final coats of paint are on, it’s important to let them completely cure before reattaching the doors and hardware.
The most common type of cabinet paint is latex, but it’s important to use an oil-based primer before you apply your latex paint. This will prevent the paint from adhering to the cabinet and causing peeling or bubbling.
If you’d like your cabinet paint to be easy to wipe clean and resist damage from cooking oils, grease, and moisture, N-Hance recommends a semi-gloss or satin finish. This will provide a beautiful, glossy finish that’s durable and will stand up to the elements.
It’s also a good idea to remove all knobs, pulls, and handles before starting the project. This will prevent you from accidentally painting over them and will make reattaching the doors much easier once the project is done. You should also number each door as you remove it so you can keep track of which one goes back where when you’re reassembling the cabinets. This will help you avoid the common mistake of misplacing cabinet doors and drawers after the project is finished.